Yeastar Cloud PBX integrates a free voicemail system. Voicemail is a modern type of answering machine that allows the callers to leave audio messages in case of unavailability.
Enable/Disable Voicemail Function
By default, the voicemail is enabled for all extension users. You can disable the Voicemail function if the user doesn’t need it.
- Go to Settings > PBX > Extensions, search for the desired extension, and click
 .
. - Select the Features tab.
- Enable voicemail by selecting the Enable Voicemail checkbox. Similarly to disable voicemail, unselect the Enable Voicemail checkbox.
- Click “Save” and then “Apply” at the top right of your screen to complete this setting.
Change Voicemail PIN/Password
Extension users can dial the voicemail feature code (default *2) on their phones to access their voicemails. To enhance the extension security, you can change the voicemail PIN on PBX web interface.
- Go to Settings > PBX > Extensions.
- Search for the desired extension, and click .
- Select the Features tab.
- In the Voicemail Access PIN field, enter a numeric PIN/password.
- Click “Save” and then “Apply” at the top right of your screen to complete this setting.
Configure Voicemail to Email
The Voicemail to Email feature of Yeastar Cloud PBX allows extension users to receive voicemail audio files as email attachments to quicken response time when they are out of office.
If an extension user would like to check voicemail messages via email, Voicemail to Email needs to be enabled for his/her extension.
*Note: To receive voicemail via email successfully, make sure the system email is working.
- Go to Settings > PBX > Extensions, search for the desired extension, and click .
- Select the Features tab.
- In the Send Voicemail to Email drop-down list, select an email type.
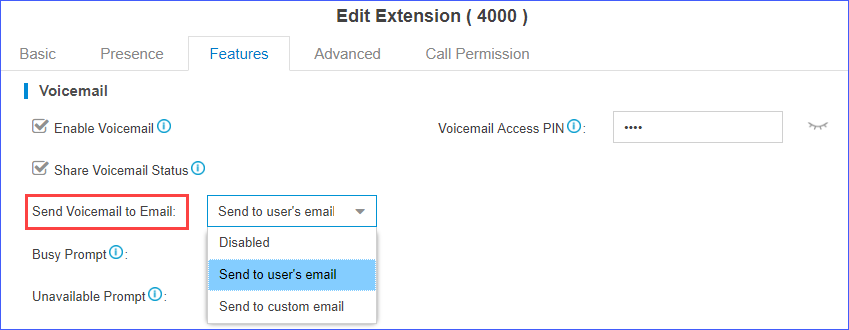
- Send to user’s email: Send voicemail to the extension user’s email address.
- Send to custom email: Send voicemail to a custom email address.
- Click “Save” and then “Apply” at the top right of your screen to complete this setting.
Edit the email template for ‘Voicemail to Email’
A default email template is used for Voicemail to Email. You can edit the template according to your needs.
- Go to Settings > System > Email > Email Templates, click beside Voicemail to Email.
- Edit the email subject and email contents.

- Click “Save” and then “Apply” at the top right of your screen to complete this setting.
Alternative voicemail retrieval methods
If users choose not to activate the Voicemail to Email feature, they can consider one of the following alternative methods to retrieve voicemail messages.
Retrieve voicemail on Linkus
Linkus Desktop CLient
On the menu bar, click ![]() to view and manage your voicemail messages.
to view and manage your voicemail messages.
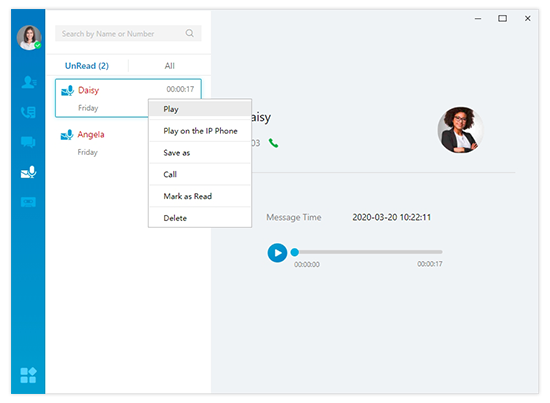
To listen to the message, right-click the desired message and choose how you want to play the message from the pop-up list.
- Play: Play the message on your computer.
- Play on the IP phone: Play the message on your IP phone.
*Note: Once a message is read, it will disappear from the Unread list. To download the message , right click the desired message, and click “Save as” to save the message to your local PC.
To change the read status of the message, right-click the desired message under the UnRead tab, and select “Mark as Read” from the pop-up list. Similarly, you can also select “Mark as Unread” for a read message under the All tab.
To delete the message, right click the desired message, and click “Delete” from the pop-up list.
To return the missed call, right click the desired message, and click “Call” from the pop-up list.
Linkus Mobile Client
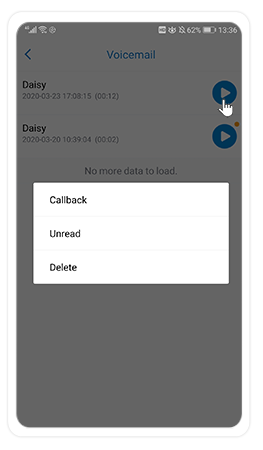
To play your voicemail message, select the Voicemail tab to view your voicemail messages, then tap ![]() to play the message.
to play the message.
To change the read status of the message, press and hold the message and select “Read” or “Unread” in the pop-up list. Unread message icons are displayed as ![]() .
.
To delete the message, press and hold the message, and tap Delete in the pop-up list.
To return a missed call, press and hold the message, and tap Callback in the pop-up list.
Retrieve Voicemail on a Phone
- To retrieve voicemail on a user’s own phone: Dial feature code *2
- To retrieve voicemail on a different user’s phone: Dial feature code *02 to access the voicemail main menu, then enter the desired extension number and voicemail PIN to retrieve voicemail.
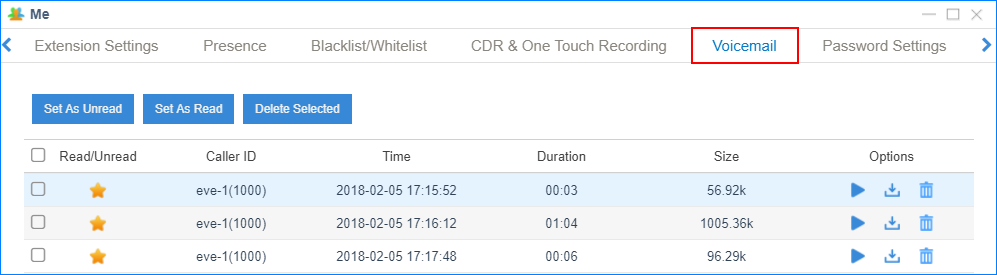
Retrieve Voicemail on Web Page
Extension users can log in to the PBX web page to check their own voicemail.
- User name: The extension user’s email address.
- Password: The extension user’s Password.
Retrieve Voicemail via IVR
If you check the option Dial to Check Voicemail for an IVR; users can access the IVR to check their voicemails. This solution is for the users who are outside the office to check their voicemails.

Change Voicemail Greetings
Global voicemail greetings can be changed for all the extension users, or change voicemail greeting for a specific extension.
Components of a Voicemail Greeting
When an extension user is unavailable, the voicemail greeting consists of 3 audio clips: Unavailable Prompt + Voicemail Prompt + “Di”.
When an extension is busy on a phone, the voicemail greeting consists of 3 audio clips: Busy Prompt + Voicemail Prompt + “Di”
- Default Unavailable Prompt: The person at the extension XXXX is unavailable.
- Default Busy Prompt: The person at the extension XXXX is busy.
- Default Voicemail Prompt: Please leave your message after the tone, when done hang up or press the pound key (#).”
Change global voicemail greetings
- Prepare your custom prompt files, and upload to the PBX.
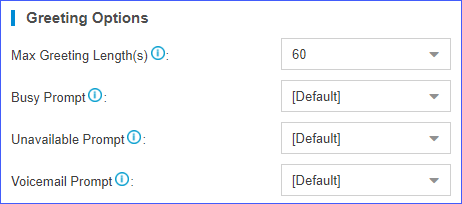
- Go to Settings > PBX > General > Voicemail > Greeting Options.
- Change the global voicemail greetings.
- Busy Prompt: Select the prompt that will be played when the extension is busy.
- Unavailable Prompt: Select the prompt that will be played when the extension is unavailable.
- Voicemail Prompt: Select the prompt that will be played after Busy or Unavailable prompt.
- Click “Save” and then “Apply” at the top right of your screen to complete this setting.
Change voicemail greetings for a specific extension
By default, the global busy prompt and global unavailable prompt are applied to all extensions. If an extension user wants to use her/his personal greetings, you can change the prompts for the extension.
*Note: The greeting prompt file format should be “.wav”, “.WAV” or “.gsm” file.
The file size must not be larger than 8MB.
Supported Format: PCM: 8K, 16bit, 128kbps; A-law(g.711): 8k, 8bit, 64kbps; u-law (g.711): 8k, 8bit, 64kbps; gsm: 6.10, 8k, 13kbps.
- Go to Settings > PBX > Extensions, search for the desired extension, and click .
- Click the Features tab.
- Click Browse to upload a prompt file.
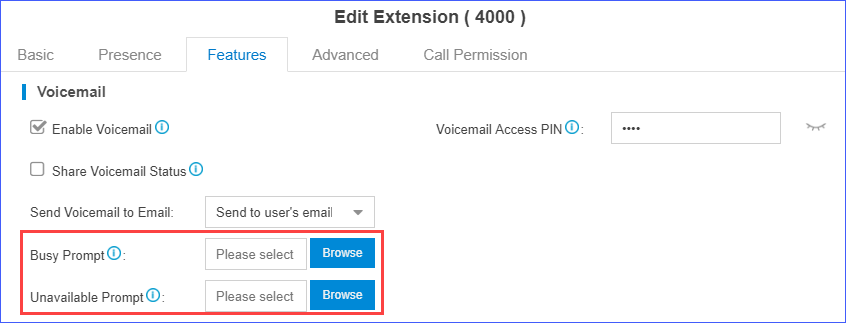
- Click “Save” and then “Apply” at the top right of your screen to complete this setting.
Manage Voicemail Messages Centrally
In Yeastar Cloud PBX, you have two options to manage voicemail messages centrally and efficiently: subscribe BLF keys on a phone to monitor multiple extensions’ voicemail status or receive multiple extensions’ voicemail messages from one mailbox.
Monitor voicemail status by BLF keys
By default, an extension’s voicemail status cannot be monitored by other users. To monitor an extension’s voicemail status, you need to enable Share Voicemail Status on the extension.
We take Yealink T27G v69.82.0.20 as an example below to introduce how to monitor voicemail status of extension 4000 by extension 1000.
Step 1
Enable voicemail status sharing feature of extension 4000
- Log in to the PBX web interface, go to Settings > PBX > Extensions, and edit the extension 4000.
- Under the Features tab, select the Share Voicemail Status checkbox.

- Click “Save” and then “Apply” at the top right of your screen to complete this setting.
Step 2
Set BLF key to monitor the voicemail status.
- Log in the IP phone where extension 1000 is registered, click the Dsskey tab.
- Set a BLF key to monitor voicemail status of extension 4000.
- Type: Select BLF.
- Value: Enter *2{ext_num}. In this example, enter *24000.
- Line: Select the line where extension 1000 is registered on.
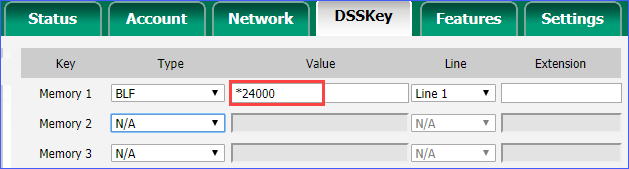
- Click Confirm.
- Result:
- Green BLF LED: The extension 4000 has NO unread voicemail messages.
- Red BLF LED: The extension 4000 has unread voicemail messages.
Receive voicemail from a mailbox
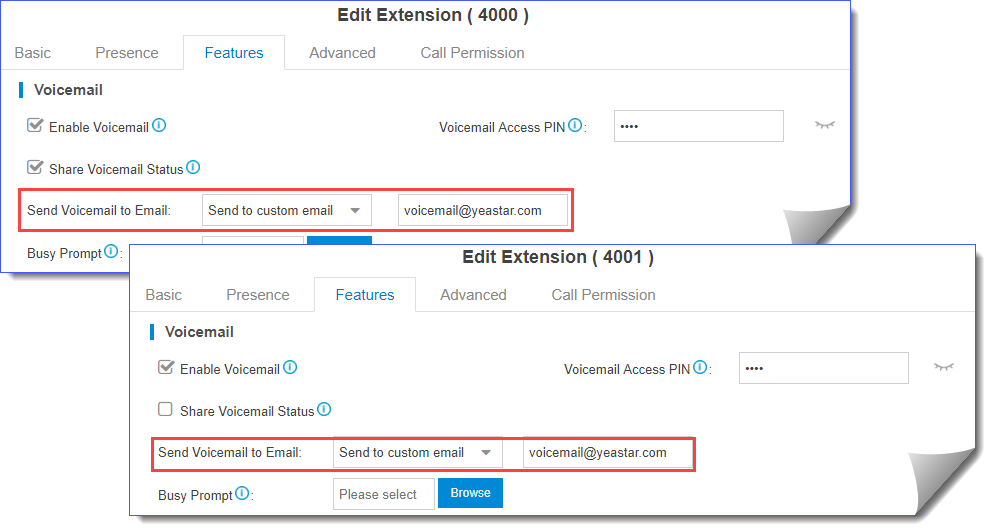
To receive multiple extensions’ voicemail messages from one mailbox, you can configure sending voicemail to a same custom email address for these extensions.
For example, to receive multiple extensions’ voicemail messages from the mailbox voicemail@yeastar.com. Set Send Voicemail to Email to the same custom email address voicemail@yeastar.com for these extensions.
Global Voicemail Settings
You can change the global voicemail message settings, and voicemail playback settings according to your needs.
The global voicemail settings will be applied to all the extensions.
Navigation path: Settings > PBX > General > Voicemail.
| Setting | Description |
|---|---|
| Message Options | |
| Max Messages per Folder | Each extension user has a Read voicemail folder and an Unread folder. You can set the maximum number of messages per folder. |
| Max Message Time | Set the maximum time of one message. |
| Min Message Time | Set the minimum time of one message. |
| Delete Voicemail | This function will work if you enable Send Voicemail to Email. If the voicemail is forwarded to the user’s email, PBX will delete voicemails from the user’s voicemail folder. |
| Ask Caller to Dial 5 | By default, when the caller accesses a user’s voicemail, PBX starts to record message automatically. If you want to prompt the caller first, you can enable this option. The caller needs to dial 5 first, then starts to record message. |
| Operator Breakout from Voicemail | If enabled, the users can dial 0 to exit the voicemail destination of an IVR. |
| Greeting Options | |
| Busy Prompt | Select the greeting that will be played when the extension is busy.Note: To use a custom prompt, you need to upload your audio file to the Custom Prompt page first. |
| Unavailable Prompt | Select the greeting that will be played when the extension is unavailable.Note: To use a custom prompt, you need to upload your audio file to the Custom Prompt page first. |
| Voicemail Prompt | Select the greeting that will be played before the caller leave a message.Note: To use a custom prompt, you need to upload your audio file to the Custom Prompt page first. |
| Playback Options | |
| Announce Message Caller ID | If enabled, the PBX will announce who left the message. |
| Announce Message Duration | If enabled, the PBX will announce the message duration. |
| Announce Message Arrival Time | If enabled, the PBX will announce when the message was received. |
| Allow Users to Review Messages | If enabled, the users can review their recorded message, and then send the messages. |
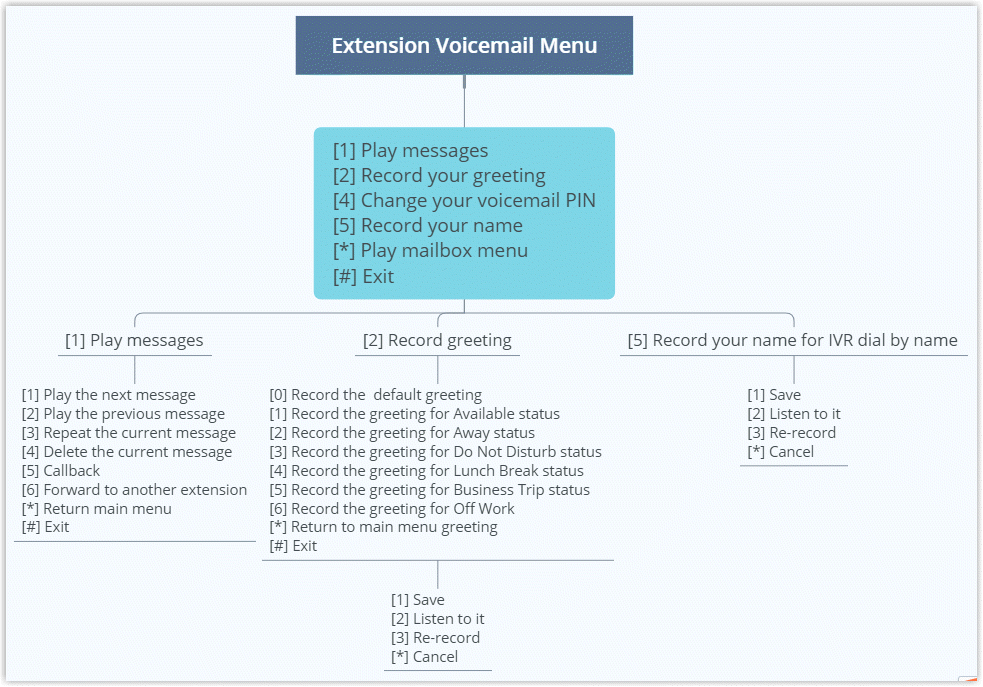
Voicemail Menu
You can dial *2 on your phone to access the voicemail menu. Below is the detailed voicemail menu.
Extension Voicemail Menu
Group Voicemail Menu
