An extension is a short number used to define a specific internal call destination within the PBX network. Extensions can be assigned to an individual user or a department within the organization.
Format your Extension Range
Yeastar Cloud PBX supports extension formats between 1 to 7 digits, with the default extension format being a 4-digit number (default range from 1000 to 5999).
Before you creating your user extensions, you can first change your extension format and range under Settings > PBX > General > Preferences > Extension Preferences > User Extension
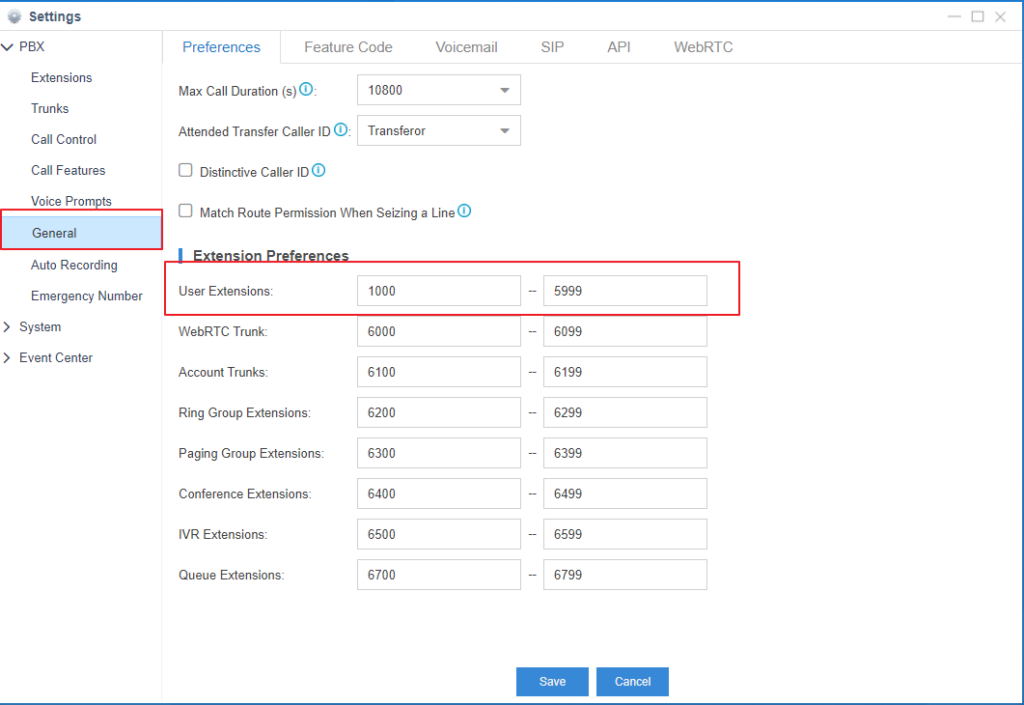
Click “Save”, and then “Apply” on the top right of your screen to complete this setting.

Create Extensions
Step 1
Go to Settings > PBX > Extensions, click “Add”.
Step 2
Under the Basic tab, set the general settings of the extension in the General section.

- Extension: Enter the extension number to be allocated.
- Caller ID: Enter the extension number. This will be the number call recipients will see on their caller ID when an internal call is made by the extension user.
- Registration Name: The name used to register the SIP extension (i.e. the extension number).
- Caller ID name: Enter the extension user name or number. The call recipient will see this caller ID name when an internal call is made by the extension user.
- Concurrent Registrations: Yeastar Cloud PBX supports SIP Forking; registering an individual extension to multiple endpoints. The maximum number of concurrent registrations is 4.
- Registration Password: The password used to register the extension (this is auto generated by the system).
Step 3
Under the same Basic tab, set user information in the User Information section.

- Email: Enter the email address that the extension user will use to reset his/her login password, receive voice mails, faxes, or PBX notifications.
- User Password: The password used to log in to the PBX or Linkus mobile client. This password is auto generated by the system.
- Prompt Language: The default prompt language is the same as the system language. If the extension user speaks a foreign language, you can set a specific system prompt. *Note: Before selecting other system prompts, go to Settings > PBX > Voice Prompts > System Prompt to download online prompts.
- Mobile Number: Extension user can receive the PBX notifications or forwarded calls on this mobile number.
Step 4 (Optional)
Pre-set user extension settings under the Presence, Features, Advanced, and Call Permission tabs.
Step 5
Click “Save” and then “Apply” at the top right of your screen to complete this setting.
Bulk Create Extensions
Step 1
Go to Settings > PBX > Extensions, click “Bulk Add”.
Step 2
Under the Basic tab, set the general settings of the extensions in the General section.
*Note: A random Registration Password and a random User Password will be assigned for each extension.

- Start Extension: Enter the first extension number, and the system will create running extensions in bulk starting with this number.
- Create Number: Enter the number of extensions to be created.
- Concurrent Registrations: Yeastar Cloud PBX supports SIP Forking; registering an individual extension to multiple endpoints. The maximum number of concurrent registrations is 4.
- Prompt Language: The default prompt language is the same as the system language. If the extension user speaks a foreign language, you can set a specific system prompt. *Note: Before selecting other system prompts, go to Settings > PBX > Voice Prompts > System Prompt to download online prompts.
Step 3 (Optional)
Click Features, Advanced, or Call Permission tab to configure other extension settings.
Step 4
Click “Save” and then “Apply” at the top right of your screen to complete this setting.
Register a SIP Extension
To make calls and receive calls from a SIP extension, you need to register the SIP extension on an IP phone or soft phone.
- Gather information of extension registration
For most SIP phones, the following items are needed for the SIP phone to register with Yeastar Cloud PBX.
- Domain name of PBX
- SIP registration port: The default port is 5060 on Yeastar Cloud PBX.
- Extension information
- Extension Number
- Registration Name
- Registration Password
- Caller ID Name
- Transport
2.Register the extension on a phone
Log in the phone web interface, fill in and save the required items to register the SIP extension.
3.Confirm registration status
You can do one of the followings to check if the extension is registered.
- On the phone web interface, check if the status indicates that the extension is registered.
- Log in PBX web interface, go to PBX Monitor > Extensions to check if the status shows
 .
.
Edit an Extension
- Log in to your PBX web interface, go to Settings > PBX > Extensions.
- Under the Extensions tab, click
 beside the extension that you want to edit.
 - Change extension settings according to your needs.
- Click “Save” and then “Apply” at the top right of your screen to complete this setting.
Bulk Edit Extensions
- Log in to your PBX web interface, go to Settings > PBX > Extensions.
- Under the Extensions tab, select the checkboxes of desired extensions, and click “Edit”.
- Change extension settings according to your needs.
- Click “Save” and then “Apply” at the top right of your screen to complete this setting.
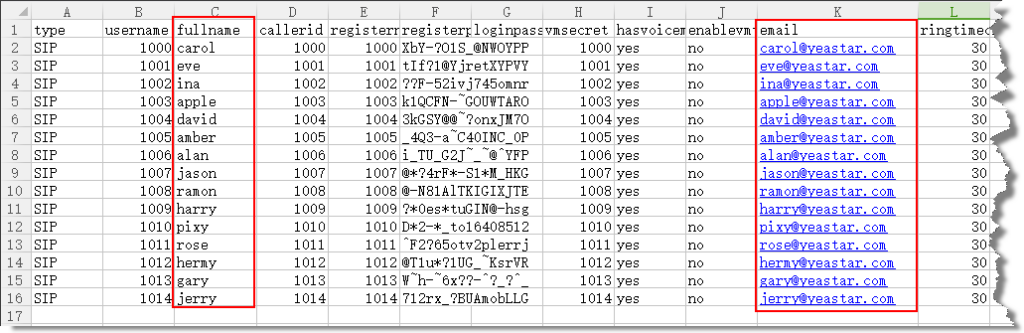
Bulk Edit Extension Names and Emails
To bulk edit extension names and emails, you need to export the extensions from Yeastar Cloud PBX first before editing the extension names and email addresses in a CSV. file, and then importing the file back into the PBX.
Step 1
Log in PBX web interface, go to Settings > PBX > Extensions, click “Export” to export all the extensions.
Step 2
Edit the user names and email addresses in the CSV. file, and then save.
Step 3
Import the CSV file to the PBX.
- Go to Settings > PBX > Extensions, click “Import”.
- On the pop-up dialog, click “Browse”, and select your CSV file.
- Click “Import”. *Note: You may get an error prompt like the following figure.
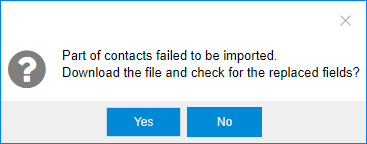
- Click “Yes” to check the log. *Note: Ignore the error if the Error Cause displays “username[1000]: The imported record is existing, the record has been overwritten”.
Step 4
Check the imported extensions on your PBX.

Delete an Extension
- Log in in your PBX web interface, go to Settings > PBX > Extensions.
- Under the Extensions tab, click
 beside the extension that you want to delete.
 - Click “Save” and then “Apply” at the top right of your screen to complete this setting.
Bulk Delete Extensions
- Log in PBX web interface, go to Settings > PBX > Extensions.
- Under the Extensions tab, select the checkbox of desired extensions, and click “Delete”.
- Click “Save” and then “Apply” at the top right of your screen to complete this setting.
Import/Export Extensions
The extensions configured on Yeastar Cloud PBX can be exported and saved as a template. You can fill in desired extension information and import the CSV file to PBX again.
Export Extensions
- Log in to your PBX web interface, go to Settings > PBX > Extensions.
- Click “Export” to export the extension details to a CSV. file.
Import Extensions
- Log in to your PBX web interface, go to Settings > PBX > Extensions.
- Click “Import”.
- On the Import Extension window, click “Browse” to select your CSV. file.
- Click “Import”.
System Deployment: Send Extension Information
Once extension configurations are complete, you can send the individual extension information to respective users via email. Information for extension registration, Linkus login, and PBX login will be detailed in the email.
All content in the welcome email is based on a default template by Yeastar. Depending on your requirements, users are able to edit the subject and content in the Welcome Email.
Step 1
Log in to your PBX web interface, go to Settings > PBX > Extensions, then click “Welcome Email”.
Step 2
Select “All Extensions” to mass send the welcome email to all users.
To send welcome emails to selected users, click “Selected Extensions”, then push the desired extensions from the Available box to the Selected box.

Step 3
Click “Send”
Using Extension Groups
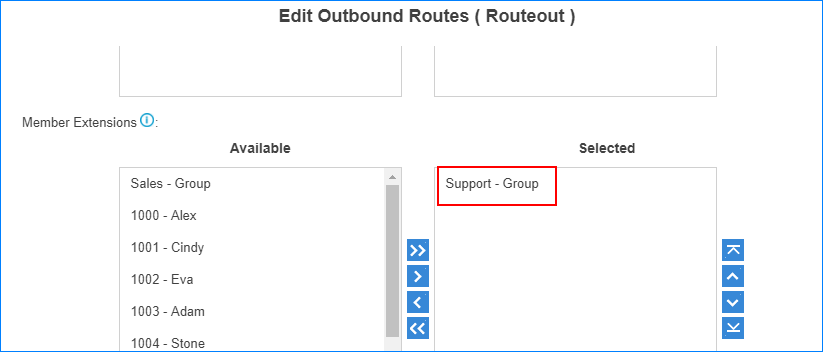
You can use the extension groups when you need to assign extensions for outbound routes, ring groups, queues, etc.
For example, if you want to set an outbound route and only allow Support group members to make outbound calls through this route, you can simply assign the Support extension group to this configuration instead of assigning individual extension members one by one. It simplifies the configuration process.
Create an Extension Group
You can assign and categorize extensions into different groups. Extension groups simplify the configuration process.
- Go to Settings > PBX > Extensions > Extension Group, click “Add”.
- Type in a Name to help you identify the group.
- Push specific extensions for the particular group you want to create from the Available box, to the Selected box.
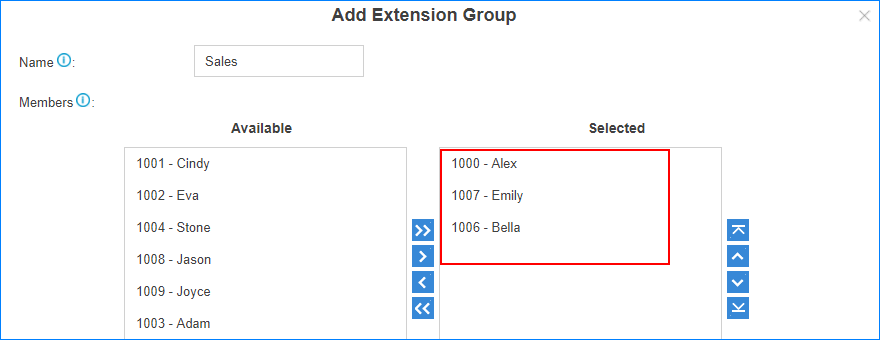
- Click “Save” and then “Apply” at the top right of your screen to complete this setting.
Edit extension groups
You can edit the group name, add more extensions to the group or remove extensions from the group.
- Go to Settings > PBX > Extensions, search and find the desired extension group, click .
- Edit the group as desired
- Click “Save” and then “Apply” at the top right of your screen to complete this setting.
Delete extension group
- Go to Settings > PBX > Extensions > Extension Group, search for the desired extension group, and click .
- Click “Yes” to confirm.
Call Monitoring Overview
Call Monitoring allows authorized users (“supervisor”) to monitor another extension user’s call in real time. The supervisor can dial “feature code” + “extension number” to monitor the extension user’s call.
Go to Settings > PBX > General, click Feature Code tab.
In the Call Monitor section, you can enable or disable monitor modes, and modify corresponding feature codes.
Yeastar Cloud PBX supports the following monitor modes:
- Listen (Default code: *90): Listen mode allows a supervisor to listen to a call in real time. The monitored extension user and call end recipient will not be able to hear anything the supervisor says.
- Whisper (Default code: *91): Whisper mode allows a supervisor to listen to a call in real time, and speak to the monitored extension user privately. The call end recipient will not be able to hear the supervisor.
- Barge-in (Default code: *92): Barge-in mode allows a supervisorr to listen to a call in real time and speak with both the monitored extension user and call end recipient.
Configure Call Monitoring
To monitor an extension, you need to set monitor settings for both the supervisors and the monitored extension users.
Step 1
Enable and select a monitor mode for the supervisor.
- Go to Settings > PBX > Extensions, click beside the desired extension.
- On the configuration page, click Features tab.
- Under the Monitor Settings section, select a Monitor Mode from the drop-down list for the supervisor.
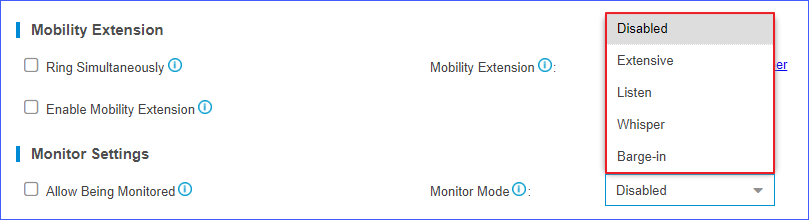
- Disabled: Not allowed to monitor other extension users’ call.
- Extensive: Use any one of listen, whisper, or barge-in mode to monitor.
- Listen: Listen to a call in real time, but you can not talk with the monitored extension users.
- Whisper: Listen to a call in real time, and talk with the monitored extension users privately.
- Barge-in: Listen to a call in real time and talk with both parties.
- Click “Save” and then “Apply” at the top right of your screen.
Step 2
Set the extension which will be monitored
- Go to Settings > PBX > Extensions, click beside the desired extension.
- On the configuration page, click Features.
- On the Monitor Settings section, select the checkbox for Allow Being Monitored.

- Click “Save” and then “Apply” at the top right of your screen to complete this setting.
Call Permission
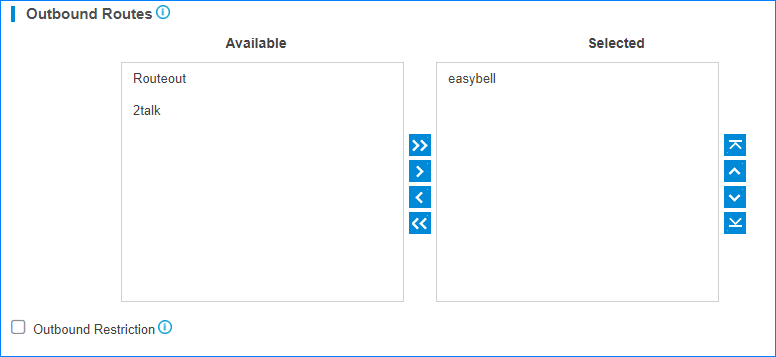
Set Call Permission of an Extension
On the Extension configuration page, you can set the outbound call permissions for the extension user. The extension user will have the permission to make outbound calls through the selected outbound routes.
- Go to Settings > PBX > Extensions, click beside the desired extension.
- On the Extension configuration page, click Call Permission tab.
- Select outbound routes for the extension by pushing the desired route from Available box to Selected box.
Outbound Restriction
Prohibit Outbound Calls
Select the Outbound Restriction option to prohibit an extension from making outbound calls. On the Extensions page, the extension will be locked and the extension status will show ![]() .
.
* Note: If the extension user makes outbound calls over the limit of Outbound Restriction rule, the extension will also be locked.

Cancel Restriction for Outbound Calls
Double click the icon ![]() or unselect the checkbox of Outbound Restriction to allow this extension to make outbound calls.
or unselect the checkbox of Outbound Restriction to allow this extension to make outbound calls.